Additional notes:
Note:: The following tutorial also applies to the LBM format in the latest SDK Texture Kit.
There are a couple of downloads. A Corporate Interceptor, which replaces the comsec. Extract the file; /ships/player/comsec.ini from the resource.zip file, to either <install directory>/resource/ ships/player/ or wherever you put your mods.
You can also download example interceptor Firefly from here:
(Which you can use with the Extra screen in the game)
- Paintshop Pro, Photoshop or any graphics package that can handle .raw files and .iff files
- Notepad or raw text editor to edit the .ini (configuration) files
- Winvi, Axe or any HEX editor to edit and save the .pso files
The Storm Petrel
I will use enemy faction's Storm Petrel (not the one from act 0) for this tutorial, because it has the smallest amount of skin files and therefore is easiest to use.
NOTE: This tutorial assumes that you have an understanding of modifying the ships behaviour and loadout, and that you are now at the stage of creating and applying the skins:
This method can be applied to any of the ships, the only difference being the name of the texture files.
NOTE: Remember to save and try what you have done from time to time!
PART 1 - Preparation for the new skin
Go to the folder you've extracted the files and delete all .ftc files, as these are not required. This is where you're first choice comes, do you want to change all the specific type ships skin? Or only the one? If you want to let every ship of this type have the skins, delete the .PSO files. But if you want the skins to affect only your one ship, leave them in. Also leave the .lws files (eg. setup.lws).
NOTE: If you want all ships have the new skin, you wont need hex editor.
PART 2 - Opening and Saving the textures to correct formats
- Type 256 to width and height
- Set the channels to 3 (RBG) colour channels
- Header size to 48 (see note below)
- Interleaved (RGB RGB...) Note: In PhotoShop just has the interleave option
- Order RBG
- Make sure that no other options are selected, like flipped.
- Press ok
Note: The header size is dictated by the file size and the x,y and z coordinates (although the z coordiante is not critical). You will need to experiment with this for the moment. Suffice to say I have found the SDK textures (193kb) work well with 48kb headers. Where as the encyclopedia images (257kb) work with 36kb headers.
Now open all of the RAW (ftu) files and save them to the .iff format [Amiga (.iff)]
Note File formats IFF/LBM: The PhotoShop IFF export option is not compatible with the Amiga IFF format. Likwise the LBM format is recognised as the DeluxePaint format by both PhotoShop and Paintshop Pro.
Further notes from Jet:
When you open the .ftu file, if the image doesn't look right just use another set of width and height (keep to 16, 32, 64, 128, 256, 512, etc. numbers, the images don't seem to use other format that square).
Using files in iff format (just like the reticle crosshair mod) will do to replace game images (you just have to keep in mind that the .iff files are lower priority than the ftc/ftu files in the current search_paths (so if you have the 3 of them in the same folder, the old ftu/ftc files will be selected).
VERY IMPORTANT: Do not change any filenames if you want to make a "new" ship!
If you want to change names, be sure to read PART 4!
PART 3 - Fixing the textures to appear correctly in the game
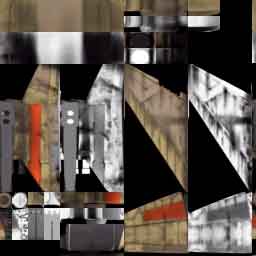
Select and copy the misplaced pixels. Then select all and move it so that the green dot and the other pixels you just copied will not be seen anymore. Then paste them to the left side where you got some free area by moving all pixels to the right. Then save. Do this with all the RAW (iff) files and the textures should appear correctly in the game.
NOTE: The green dot(s) are actually the two missing pixels from the top. If you use a graphics program, which can change the color easily (like in psp: retouch tool's color to target), you can move it up and make it fit the other pixels near it. Of course you can just color it in or leave the small black area in the corner. It's entirely up to you. (Sometimes it looks as good with or without it).
Missaligned
Aligned
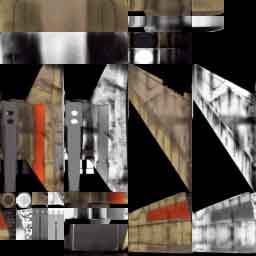
If everything seems correct, you can start doing anything you like with the textures. In other words. TIME TO DO THE SKIN !
NOTE: Filename conventions. Usually the file names end with two number with an underscore between i.e 0_1, 1_2, 2_0 and so on. The end number appears to represent distance so filename1_0 shows a smaller representation to filename1_9.
NOTE: The editing of texture files is not covered, this entirely down to your artistic license.
PART 4 - Assigning skins to one ship.
Choose a name for your ship's avatar. In this example we'll call the interceptor the firefly.
Change the avatars/interceptor/ folder's name to /avatars/firefly. Also rename the .pso files, i.e:
Interceptor_LOD1_RTO_T.PSO to Firefly.LOD1_RTO_T.PSO.
Now open the comsec.ini that you extracted. Make sure that read only is unticked in the file. Change the line:
[Avatar]
name=lws:/avatars/interceptor/setup
to
[Avatar]
name=lws:/avatars/firefly/setup
Open the setup.lws and change the lines:
LoadObject Objects_IW2\Ships\InterSeptor\RTO\Interceptor_RTO_T.lwo
LoadObject Objects_IW2\Ships\InterSeptor\RTO\LOD1\Interceptor_LOD1_RTO_T.lwo
LoadObject Objects_IW2\Ships\InterSeptor\RTO\LOD2\Interceptor_LOD2_RTO_T.lwo
to
LoadObject Objects_IW2\Ships\firefly\RTO\firefly_RTO_T.lwo
LoadObject Objects_IW2\Ships\firefly\RTO\LOD1\firefly_LOD1_RTO_T.lwo
LoadObject Objects_IW2\Ships\firefly\RTO\LOD2\firefly_LOD2_RTO_T.lwo
Now rename the texture files (.iff) to whatever you like, but the filename must be same amount of characters as the original, i.e. I0_0.iff to F0_0.iff, I0_1.iff to F0_1.iff and so on.
If you put more, the textures will not work and the ship will appear without textures.
Now open one of the .pso files WITH WinVi (or other hex editor), and change all words which have I0_? - where ? is 1, 2, 3 and so on - to F0_?
Do the same for all other .pso files where you find relative file names.
EXAMPLE WinVi shows:
^DI0_0.LBM
I0_1.LBM
I0_2.LBM
I0_3.LBM
SHDR
Ignore the [^D] and .LBM, just change I?_? to match your files (In this Firefly tutorial for example. [^D]I0_0.LBM to [^D]F0_0.LBM and so on.
That's it. You should now have a fully customised looking Storm Petrel. If you have further questions you can contact me at the address at the top of the page.